Home
msts-trains StationTweaks
Camera AnglesA New Headout View
Equipment & Scenery
SP Alco S4 #1474New Rail 1
Real Falling Snow
City Track
Utility
Transparent Driver AidsKeyboard Template
Miscellaneous
Favorite ScreenshotsLinks
camera angles
The camera configuration file, camcfg.dat, can be configured to give you different and sometimes better views than the default MSTS views. Here are some camera hacks I have done. Some of these hacks are original, some not, and some are tweaks of work others have done. Look for the camcfg.dat file in the Train Simulator\GLOBAL folder. When editing this or other MSTS files, be sure to use a unicode compatible text editor, like Wordpad. I have found that Notepad will work in Windows XP, but be sure to use the SAVE function to resave the changed file (not SAVE AS). And ALWAYS be sure to make a backup copy of the original camcfg.dat file before you start.

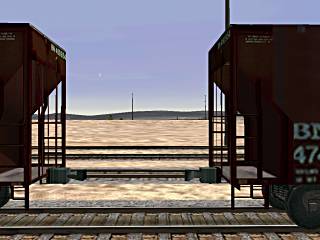
Coupling Cam (6)
I always found the coupling view a little awkward to use because it looks straight down from above. Here's a different coupler view, one viewed from the yard man's standpoint walking alongside the cars. While in this view, hold the right mouse button down and move the mouse left and right to look up and down the tracks. The arrow keys do not work in this view. Find the Coupling Cam section and make the following changes:
camera ( CamTypeCoupling
CamType ( CamTypeCoupling CamControlRotate )
CameraOffset ( -8 2.5 0.0 )
Direction ( 0 90 0 )
RotationLimit ( 0 360 0 )
Fov ( 54 )
ZClip ( 0.5 )
WagonNum ( -1 )
Description (Coupling_Cam)
)
The CamControl field has been changed to ROTATE. The DIRECTION field has been changed to 0 90 0 which orients the viewer looking parallel to the horizon (the first 0), and to the right across the tracks (the 90). The ROTATION LIMIT has been changed to 0 360 0. This gives you the ability to look all around, at eye level. Set the FOV to 54. Remember, you must use the right mouse button to look around. The distance between the cars is still displayed in the window when you get close enough.
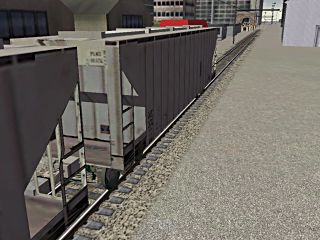
Ground Level Coupling Cam View (6)
Yard Cam (7)
For the longest time I couldn't figure out why the yard cam wouldn't work. Turns out the yard cam only works when you are in an area designated to have a yard view. And just because you are in a yard does not mean it has been designated. Lots of yards are not designated. Sometimes only a portion of a yard has been designated. And when driving in a yard you only know that portion has been designated if the yard view works when pressing the 7 key. Confusing, huh.
Okay, when the viewer enters a designated yard area, you can press the 7 key and get an overhead view of that area. Now for the good part. If you change the camera control to CAMCONTROLFULL, you can fly around the route just like when in the Route Editor, using the arrow keys and the mouse. Note that entering any other view while doing this resets your flying abilities. Use the shift key in combination with the arrow keys and mouse to fly really fast!
Tip: In the Route Editor, it is possible to designate any area on a route as having a yard view.
Find the Yard Cam section and make the following changes. Be sure to change the FOV to 30. This will give you some very good screenshots:
camera ( CamTypeYard
CamType ( CamTypeYard CamControlFull )
Fov ( 30 )
ZClip ( 0.5 )
WagonNum ( 0 )
Description (Yard_Cam)
)
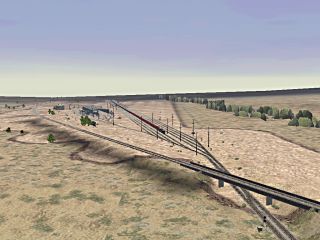
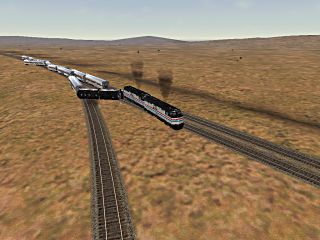
Flying Yard Cam View (7)
Notice the long freight in the distance
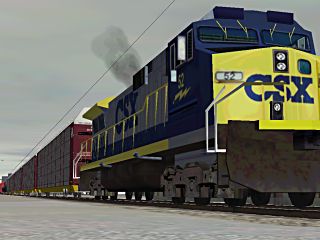
Spotter Cam (4)
The Spotter Cam is lots of fun to play with. It seems everybody has their own version, hacked to the way they like it. It is important to add the CAMCONTROLFULL option which will give you a little more control. Unfortunately, CAMCONTROLFULL will not give you the same flying abilities as it does in the Yard Cam. I can't tell you why. I'm not sure anybody knows but the developers. Maybe Kuju will give full control everywhere in MSTS2.
The field of view (FOV) has been changed to 30 to give a closer, zoom view. Something close to this value seems to give the best screenshots. 54 gives a natural distance view. Values higher than 54, like 80, 90, or 100 give more of a wide angle view, good for long distance viewing of passing trains.
Note with these changes that the mouse does not work to control the view. Use the arrow keys in combination with the CTRL key to change viewing angle, height, and distance. The view will reset if you get too far away, and is touchier when the FOV is set low (less than 54). Press CTRL-SHIFT-9 to keep the camera stationery while the train passes by out of view.
Find the Spotter Cam section and make the following changes. The FOV has been set up for best closeup screenshots (30):
camera ( CamTypeSpotter
CamType ( CamTypeSpotter CamControlFull )
Fov ( 30 )
ZClip ( 0.5 )
WagonNum ( 0 )
Description (Spotter_Cam)
ObjectOffset (0.0 3.0 0.0)
)
Close Up Spotter Cam View (4)
Rear Tracking Cam (3)
I kind of like the Rear Tracking Cam to look past the end of the train off into the distance from where it came, showing the last car. You can do the same. Find the Rear Tracking Cam section and make the following changes to the CameraOffset field. Also change the FOV to 54:
camera ( CamTypeRearTracking
CamType ( CamTypeRearTracking CamControlTethered )
CameraOffset ( -5 5 15 )
Fov ( 54 )
ZClip ( 0.5 )
WagonNum ( -1 )
Description (Tracking_Cam_2)
)
Rear-Facing Rear Tracking Cam View (3)
Derail Cam (automatic)
There's very little you can do with the Derail Cam, as the sim pretty much takes over when a train derails. Here I have changed the view to a more wide angle view to see more of the train and surrounding area by increasing the FOV to 70. Once the engine has stopped, use the arrow keys to pan around some to check out the action. Note if you tweak on your own and change the CamControl to CAMCONTROLFULL, it will crash the sim on a derail.
Find the Derail Cam section and make the following changes:
camera ( CamTypeDerail
CamType ( CamTypeDerail CamControlDerail )
Fov ( 70 )
ZClip ( 0.5 )
WagonNum ( 0 )
Description (Derail_Cam)
CameraOffset ( 0 30 0 )
)
Wide Angle Derail Cam View (automatic)
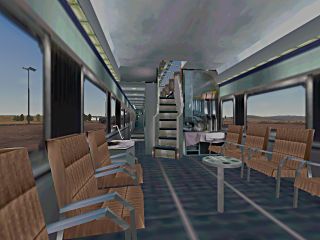
Passenger Cam (5)
The Passenger Cam can be hacked to give you a lot more inside scenery. Change the RotationLimit to 60 180 0 to increase your pan range a little bit, and increase the FOV to 90. Increase the FOV higher than 90 for a real wide angle view. Be careful increasing values of FOV or RotationLimit too much, as often parts of the passenger cabin are not there, and you will find yourself looking outside! Find the Passenger Cam section and make the following changes:
camera ( CamTypePassenger
CamType ( CamTypePassenger CamControlRotate )
CameraOffset ( 1.046 2.14 4.506 )
Direction ( 0 0 0 )
RotationLimit ( 60 180 0 )
Fov ( 90 )
ZClip ( 0.1 )
WagonNum ( 2 )
Description (Passenger_Cam)
)
Wider Angle Passenger Cam View (5)